MoleditPy User Manual
1. Introduction
MoleditPy is a molecular editing software developed in Python. Through an intuitive interface, it allows for the drawing and editing of molecular structures in 2D, as well as the generation, display, and editing of 3D structures.
Main Features:
- 2D Molecular Editing: Add, delete, or modify atoms and bonds; create structures using templates. Also supports user templates, allowing users to save and use their own specified structures.
- 3D Structure Generation: Generate 3D coordinates from 2D structures and perform structure optimization using RDKit or Open Babel (optional).
- 3D Molecular Display: Display 3D molecules in multiple styles, including Ball & Stick, CPK (Space-filling), Wireframe, and Stick.
- File Operations: Save and load projects in a proprietary format (.pmeprj). Supports import and export of standard chemical file formats (MOL, SDF, XYZ) and SMILES, InChI strings. Exported files can be used for DFT calculations. Also supports exporting as images (PNG) or 3D models (STL, OBJ) for 3D printing.
- Molecular Analysis: Display basic molecular properties such as SMILES, InChI, Molecular Formula, Molecular Weight, LogP, and TPSA.
- 3D Measurement: Measure distances between atoms, angles between three atoms, and dihedral angles between four atoms in the 3D view.
- 3D Editing: Translate the entire molecule, planarize selected atoms, align to specific axes, adjust bond lengths, angles, and dihedral angles, and create mirror images.
- Customization: Configure 3D display settings such as background color, lighting, and detailed display styles.
- Plugin System: Extend functionality with Python scripts. Place custom scripts in
~/.moleditpy/pluginsto add new features to the “Plugin” menu.
![]()
2. Installation and Launch
-
Install the Package This will automatically install the correct
moleditpy(for Win/Mac) ormoleditpy-linux(for Linux) as a dependency.pip install moleditpy-installer -
Create the Shortcut After installation, run this command to create the shortcut in your application menu (e.g., Start Menu or Applications folder).
moleditpy-installer
Launch:
You can launch it with the following command.
moleditpy
Command-line Options:
| Option | Description |
|---|---|
moleditpy [file] |
Open the specified file on startup |
moleditpy --version |
Print the version number and exit |
moleditpy --safe |
Start in safe mode: all plugins are skipped on launch. Use this if a plugin is causing a crash or preventing startup. |
moleditpy --install-plugin [PATH] |
Install a plugin from a .py, .zip, or folder in headless mode (requires manual confirmation). |
Windows Installer
MoleditPy offers a Windows installer. This allows you to easily install MoleditPy without manually setting up a Python environment.
3. Screen Layout
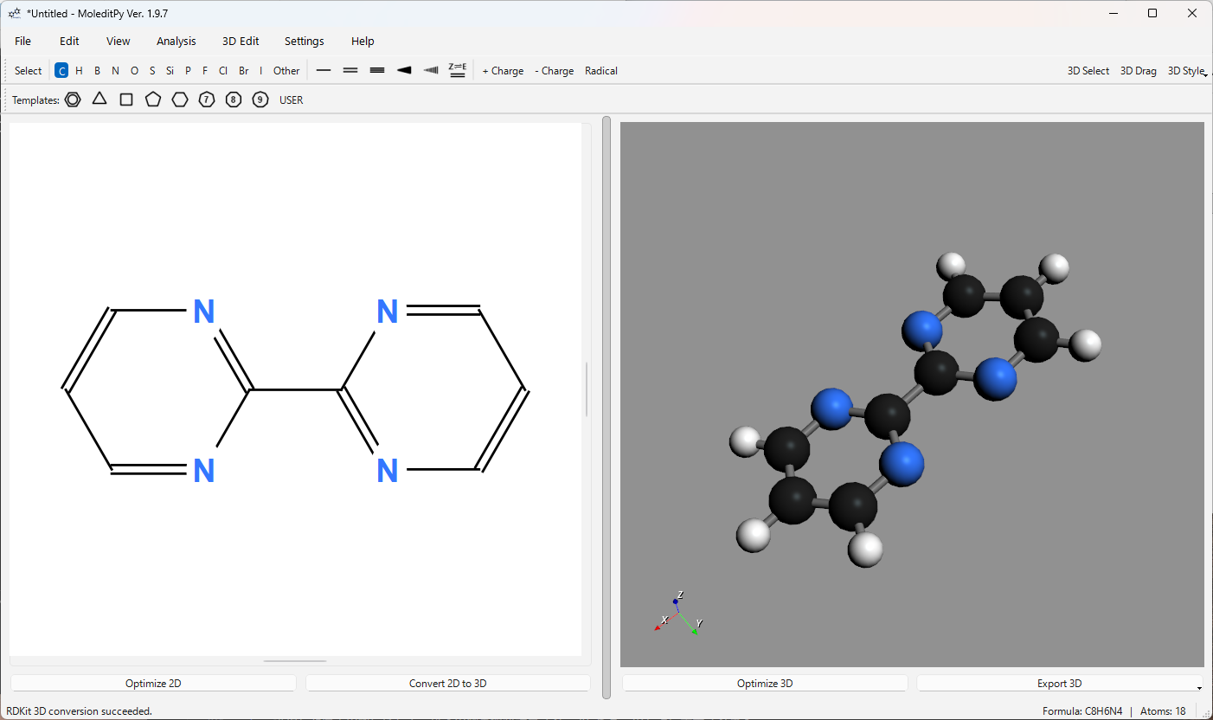
The MoleditPy main window is primarily composed of the following elements:
- Menu Bar: Contains functions for file operations, editing, viewing, analysis, settings, and help.
- Main Toolbar: Provides basic tools for selecting atom/bond drawing modes, setting charges/radicals, and changing 3D display styles.
- Template Toolbar: Contains buttons for selecting templates such as ring structures.
- 2D Edit View: The main canvas for drawing and editing molecular structures. You can add and edit atoms and bonds using mouse operations.
- 3D View: Displays the 3D structure of the generated or loaded molecule. You can rotate, zoom, and pan with the mouse. 3D measurement and editing are also performed in this view.
- Splitter: The boundary line between the 2D view and the 3D view. You can drag it to resize the display area of each view. You can also quickly switch split ratios via
View>Panel Layout(or Ctrl+1, 2, 3). - Status Bar: Displays the current operating mode, messages, and the molecular formula/atom count being calculated.
4. Basic Operations (2D Edit View)
In the 2D Edit View, you create and edit molecular structures using the mouse, toolbar, and keyboard shortcuts.
4.1. Selecting a Drawing Mode
Select a drawing mode by clicking a button on the main toolbar or pressing the corresponding keyboard shortcut.
- Select (Space): Mode for selecting and moving atoms or bonds.
- Atom buttons (C, H, N, O, etc.): Mode for adding the corresponding element’s atom. Click to place an atom; drag to add an atom and a bond.
- Bond buttons (Single bond, Double bond, etc.): Mode for adding or changing the corresponding type of bond. Drag between atoms to create a bond; click an existing bond to change its type.
- Charge buttons (+/-): Mode for increasing or decreasing the charge on an atom by clicking it. Right-click to reset the charge to 0.
- Radical button (Radical): Mode for toggling the number of radical electrons on an atom (0 -> 1 -> 2 -> 0) by clicking it. Right-click to reset to 0.
- Template buttons (Benzene ring, etc.): Mode for adding a template structure by clicking on the canvas. It can also snap to and merge with existing atoms or bonds.
4.2. Atom and Bond Operations
- Adding an Atom:
- Select the desired element button from the toolbar (e.g., ‘C’).
- Click anywhere on the canvas to place an atom of that element.
- Adding a Bond:
- Select the desired bond button from the toolbar (e.g., Single bond).
- Press the mouse button on Atom A, drag to Atom B, and release to create a bond between A and B.
- Start dragging in an empty area and release on Atom A to create a new atom (default Carbon) at the start point, bonded to Atom A.
- Start dragging on Atom A and release in an empty area to create a new atom (default Carbon) at the release point, bonded to Atom A.
- Selecting Atoms/Bonds:
- Select ‘Select’ mode from the toolbar.
- Click an atom or bond to select it (Shift + Click for multiple selections).
- Drag in an empty area of the canvas to make a rectangular selection.
- Moving:
- In ‘Select’ mode, drag the selected atom or bond. When an atom is moved, its connected bonds follow.
- Deleting:
- In ‘Select’ mode or any drawing mode (except template, charge, or radical), right-click the atom or bond you want to delete.
- In ‘Select’ mode, select items and press the
DeleteorBackspacekey.
- Changing an Element:
- Select the button for the element you want to change to from the toolbar.
- Click an existing atom to change its element.
- Alternatively, hover the mouse cursor over an atom and press the keyboard shortcut (e.g., ‘N’ for Nitrogen).
- Changing Bond Order:
- Select the button for the bond type you want to change to from the toolbar.
- Click an existing bond to change its type.
- Alternatively, in ‘Select’ mode, select a bond and press a keyboard shortcut (e.g., ‘2’ for a double bond).
- Setting Stereo Bonds (Wedge/Dash):
- Select the Wedge (solid) or Dash (dashed) button from the toolbar.
- Click an existing single bond to set the stereo display. Click again to reverse the direction.
- Alternatively, in ‘Select’ mode, select a single bond and press ‘W’ (Wedge) or ‘D’ (Dash).
- E/Z Configuration of Double Bonds:
- Select the ‘Toggle E/Z’ button (Z⇌E icon) from the toolbar.
- Click an existing double bond to toggle its stereo configuration in the order Z -> E -> (unspecified).
- Alternatively, hover the mouse cursor over the bond and press the ‘Z’ or ‘E’ key.
4.3. Using Templates
-
Standard Templates: Click a button on the template toolbar (benzene ring, cyclohexane ring, etc.) to select the mode, then click on the canvas to place it. Clicking on an existing atom or bond allows you to merge the structures.
-
User Templates:
- Click the ‘USER’ button on the template toolbar or use the menu
File>Save 2D as Template...to save the current structure as a template. - Clicking the ‘USER’ button opens the user template dialog.
- Click the template you want to use in the dialog to enter that template’s mode. Click on the canvas to place it. The dialog remains open, allowing you to continuously use different templates.
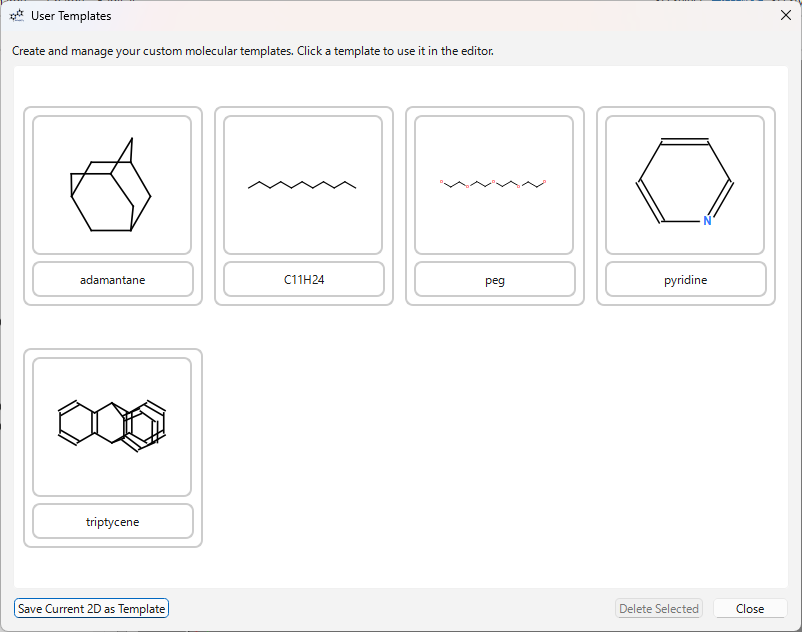
- Click the ‘USER’ button on the template toolbar or use the menu
4.4. Undo/Redo
- Use
Edit>Undo(Ctrl+Z) andRedo(Ctrl+Y / Ctrl+Shift+Z) from the menu to undo or redo operations.
4.5. Copy/Cut/Paste
- In ‘Select’ mode, select atoms or bonds and execute
Edit>Copy(Ctrl+C) orCut(Ctrl+X) from the menu. - Execute
Edit>Paste(Ctrl+V) from the menu to paste the clipboard contents at the cursor’s position. This supports internal copy & paste within MoleditPy.
4.6. Other Edit/View Functions
- Clean Up 2D: To tidy up the 2D structure, click the
Clean Up 2Dbutton at the bottom left or pressCtrl+J. - Rotate 2D…: Select
Edit>Rotate 2D...(Ctrl+R) from the menu to open a dialog for rotating the 2D molecule by a specified angle. - Add Hydrogens: Select
Edit>Add Hydrogensfrom the menu to explicitly add hydrogen atoms based on the current bonding. - Remove Hydrogens: Select
Edit>Remove Hydrogensfrom the menu to remove all hydrogen atoms. - Clear All: To delete all atoms and bonds on the canvas, execute
Edit>Clear All(Ctrl+Shift+C) from the menu. - Show Chiral Labels: Check
View>Show Chiral Labelsfrom the menu to display R/S labels for chiral centers.
5. File Operations
Perform various file operations from the File menu in the menu bar.
5.1. Project Files (.pmeprj (Python Molecular Editor Project File))
- New (Ctrl+N): Clears all current work and starts a new session. A confirmation dialog will appear if there are unsaved changes.
- Open Project… (Ctrl+O): Opens a previously saved project file (.pmeprj or .pmeraw).
- Save Project (Ctrl+S): Overwrites the current project file with the current work (2D structure, generated 3D structure, etc.). If no file name is set, the “Save As” dialog will open. .pmeprj (JSON format) is the recommended format.
- Save Project As… (Ctrl+Shift+S): Saves the current work as a project file (.pmeprj) with a new name or location.
5.2. Import
- Import > MOL/SDF File…: Loads a MOL or SDF file and displays it as a 2D structure. Even if the file contains 3D coordinates, 2D coordinates will be recalculated (stereochemistry is preserved).
- Import > SMILES…: Opens a dialog to input a SMILES string and displays the input molecule as a 2D structure.
- Import > InChI…: Opens a dialog to input an InChI string and displays the input molecule as a 2D structure.
- Import > 3D MOL/SDF (3D View Only)…: Loads a MOL/SDF file with 3D coordinates and displays it in the 3D view only (the 2D editor is cleared). This enters 3D viewer mode.
- Import > 3D XYZ (3D View Only)…: Loads an XYZ file and displays it in the 3D view only (the 2D editor is cleared). Bonds are estimated based on interatomic distances. This enters 3D viewer mode.
5.3. Export
- Export > PME Raw Format…: Saves project data in the legacy binary format (.pmeraw).
- Export > 2D Formats > MOL File…: Saves the current 2D structure as a MOL file.
- Export > 2D Formats > PNG Image…: Saves the current 2D Edit View content as a PNG image file. You can choose whether to make the background transparent.
- Export > 2D Formats > SVG Image…: Saves the current 2D Edit View content as an SVG vector image file. You can choose whether to make the background transparent.
- Export > 3D Formats > MOL File…: Saves the currently displayed 3D structure as a MOL file with 3D coordinates.
- Export > 3D Formats > XYZ File…: Saves the currently displayed 3D structure as an XYZ file.
- Export > 3D Formats > PNG Image…: Saves the current 3D View content as a PNG image file. You can choose whether to make the background transparent.
- Export > 3D Formats > STL File…: Saves the current 3D model as an STL file (no color, e.g., for 3D printing).
- Export > 3D Formats > OBJ/MTL (with colors)…: Saves the current 3D model as an OBJ file and an MTL file (with color information).
6. 3D Functions
MoleditPy provides functions to generate, display, measure, and edit 3D structures from the drawn 2D structure.
6.1. 2D to 3D Conversion
- Draw a molecular structure in the 2D Edit View.
- Click the Convert 2D to 3D button in the bottom left, or select
Edit>Convert 2D to 3D(Ctrl+K) from the menu. - The calculation begins, and progress is displayed in the status bar. 3D coordinates are generated using RDKit (ETKDGv2 algorithm), and a simple structure optimization is performed using a force field (MMFF94 or UFF).
- Upon success, the generated 3D structure is displayed in the 3D View.
(Settings): You can set the priority of libraries (RDKit, Open Babel) used for conversion, or select the “Direct” mode (use 2D coords + add H), from the menu Settings > 3D Conversion. If Open Babel is not installed, related options will be disabled.
6.2. 3D Structure Optimization
- With a 3D structure displayed, click the Optimize 3D button in the bottom right, or select
Edit>Optimize 3D(Ctrl+L) from the menu. - A more detailed structure optimization calculation is performed using the selected force field (MMFF or UFF).
- If an optimization method fails, an interactive fallback prompt may appear, offering a temporary UFF override.
- When completed, the optimized structure is redrawn in the 3D view.
(Settings): You can select the force field calculation library and method (RDKit MMFF94/MMFF94s/UFF, Open Babel MMFF94/MMFF94s/UFF/GAFF/Ghemical) from the menu Settings > 3D Optimization Settings.
6.3. Changing 3D Display Style
You can select the display style from the 3D Style dropdown menu on the right side of the main toolbar.
- Ball & Stick: Displays atoms as spheres (a scaled-down version of van der Waals radii) and bonds as sticks. This is the standard style.
- CPK (Space-filling): Displays atoms as space-filling spheres based on their van der Waals radii. Suitable for visualizing the volume and shape of the molecule.
- Wireframe: Displays only bonds as thin lines. Atoms are not displayed.
- Stick: Displays bonds as thick sticks and atoms as small spheres.
- Aromatic Ring: By default, aromatic rings (e.g. benzene) are displayed as single bonds. You can change this to show aromatic circles (torus) or Kekulé structures (alternating double bonds) in Settings.
(Settings): Details for each display style (atom size, bond radius, multiple bond offsets, rendering quality, etc.) can be adjusted from the menu Settings > Settings.... You can also change CPK Colors from Settings > CPK Colors....
6.4. 3D View Operations
- Rotate: Left mouse button drag.
- Zoom: Mouse wheel scroll (or Ctrl + Wheel).
- Pan (Move): Middle mouse button drag, or Shift + Left mouse button drag.
- Reset View:
View>Reset 3D View(Ctrl+Shift+R) from the menu resets the camera position and zoom to their initial state. - Redraw 3D Molecule:
View>Redraw 3D Moleculefrom the menu forces a redraw of the 3D structure.
6.5. Official Plugin Repository
Official plugins are available in the GitHub repository. You can download them and place them in your plugins directory (~/.moleditpy/plugins) to use them. You can also use the Plugin Manager via Plugin > Plugin Manager....
**Examples of Available Plugins
- Input Generators: Gaussian / ORCA Input Generator Neo
Evolved from simple demos to production-ready tools.
- Gaussian Version: Supports Link 0 commands, Route sections, and detailed Charge/Multiplicity settings.
- ORCA Version: Features a Block Builder to assist in constructing complex input blocks.
- Advanced Analysis & Vis: Mapped Cube Viewer & MS Spectrum Neo
Powerful tools for visual and numerical analysis of molecular properties.
- Mapped Cube Viewer: Maps properties (e.g., Electrostatic Potential) onto isosurfaces like electron density.
- MS Spectrum Neo: Simulates Mass Spectrometry spectra, supporting interactive zooming of isotope distributions and Gaussian broadening.
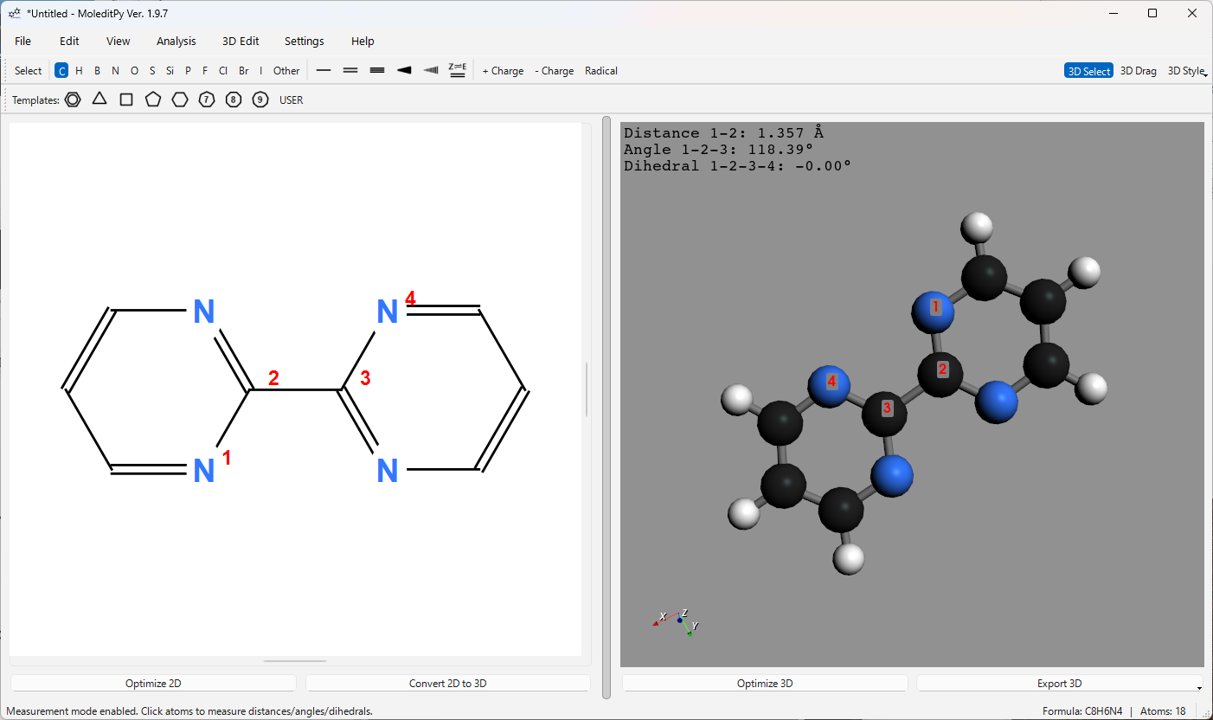
6.6. 3D Measurement Function (“3D Select” Mode)
-
Click the 3D Select button on the main toolbar to enable measurement mode.
-
Click atoms in the 3D view to select them. Selected atoms are displayed with red labels in order (1, 2, 3, 4).
-
Depending on the number of selected atoms, the following measurements are calculated and displayed in the upper-left corner of the 3D view:
- 2 atoms selected: Distance between atoms (Å)
- 3 atoms selected: Distance (1-2) and Angle (1-2-3) (°)
- 4 atoms selected: Distance (1-2), Angle (1-2-3), and Dihedral Angle (1-2-3-4) (°)
-
Clicking anywhere other than an atom, or clicking the 3D Select button again to exit the mode will clear the selection and measurements.
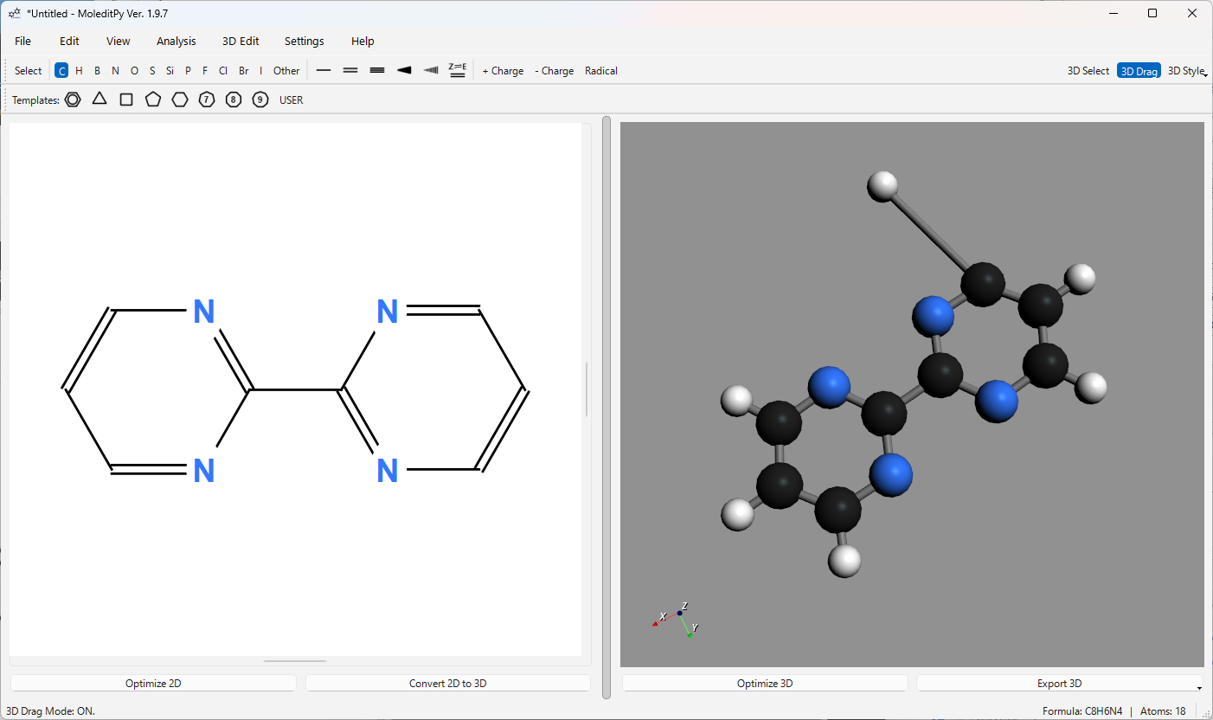
6.7. 3D Editing Function (“3D Drag” Mode / Alt Key)
You can directly edit the atomic coordinates of the 3D structure. Turn on the 3D Drag button on the main toolbar, or perform operations while holding down the Alt key.
- Atom Drag: In 3D Drag mode, clicking and dragging an atom allows you to move it in 3D space. The position is confirmed when you release the mouse button.
6.8. Other 3D Editing Functions (Menu 3D Edit)
These functions are available from the menu when a 3D structure is displayed. Many open a dedicated dialog where you can select atoms or input parameters.
-
Translation…: Translates the entire molecule or a selected group of atoms by specified coordinates. An option to translate only the selected atoms is also available.
-
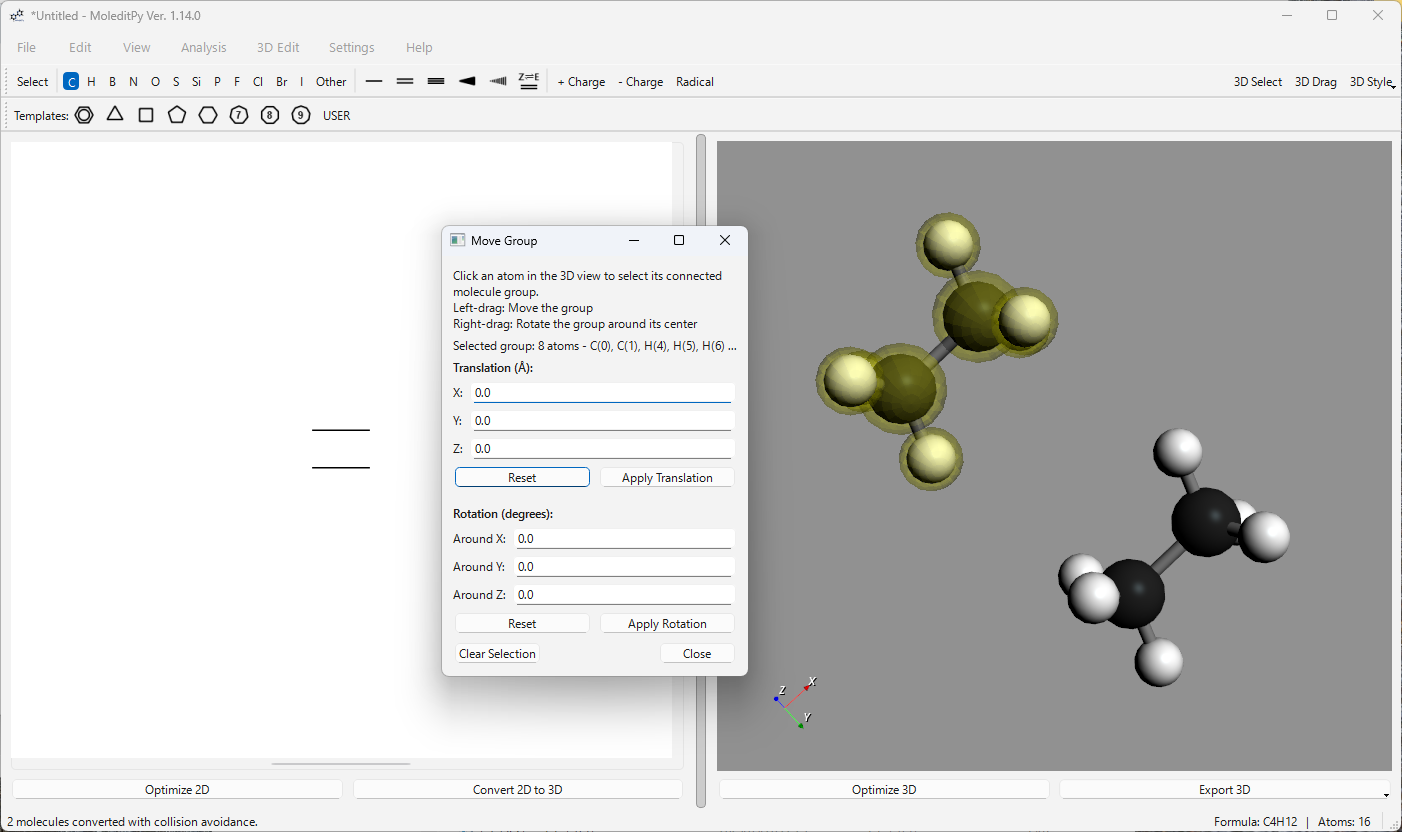
Move Group…: Allows for the selection and manipulation of connected molecular fragments (groups).
- Selection: In the 3D view, left-click an atom to select its entire connected group (highlighted in yellow). Ctrl + left-click allows for adding/removing groups from the selection.
- Interactive Move: Left-drag a highlighted atom to move all selected groups.
- Interactive Rotate: Right-drag a highlighted atom to rotate all selected groups around their combined center of mass.
- Numeric Input: Use the dialog to apply precise translation (Å) or rotation (degrees) to all selected groups.
-
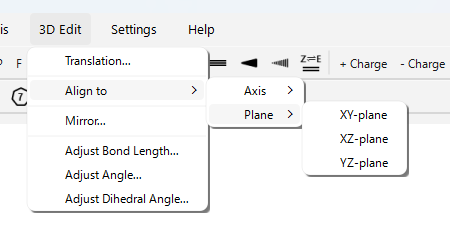
Align to > Axis > (X/Y/Z)-axis…: Rotates and moves the entire molecule so that the line connecting two selected atoms aligns with the specified coordinate axis (X, Y, or Z) (the first atom is placed at the origin, the second on the axis).
-
Align to > Plane > (XY/XZ/YZ)-plane…: Rotates the entire molecule so that the plane containing three or more selected atoms becomes parallel to the specified coordinate plane (XY, XZ, or YZ).
-
Mirror…: Creates a mirror image of the entire molecule with respect to a specified plane (XY, XZ, YZ).
-
Adjust Bond Length…: Changes the distance between two selected atoms to a specified value. You can choose to fix one atom (or its connected group) or move both. Includes an interactive slider for real-time adjustments.
-
Adjust Angle…: Changes the angle formed by three selected atoms (1-2-3) to a specified value. You can choose to rotate the atom 3 side (or its connected group) or rotate both arms equally. Includes an interactive slider for real-time adjustments.
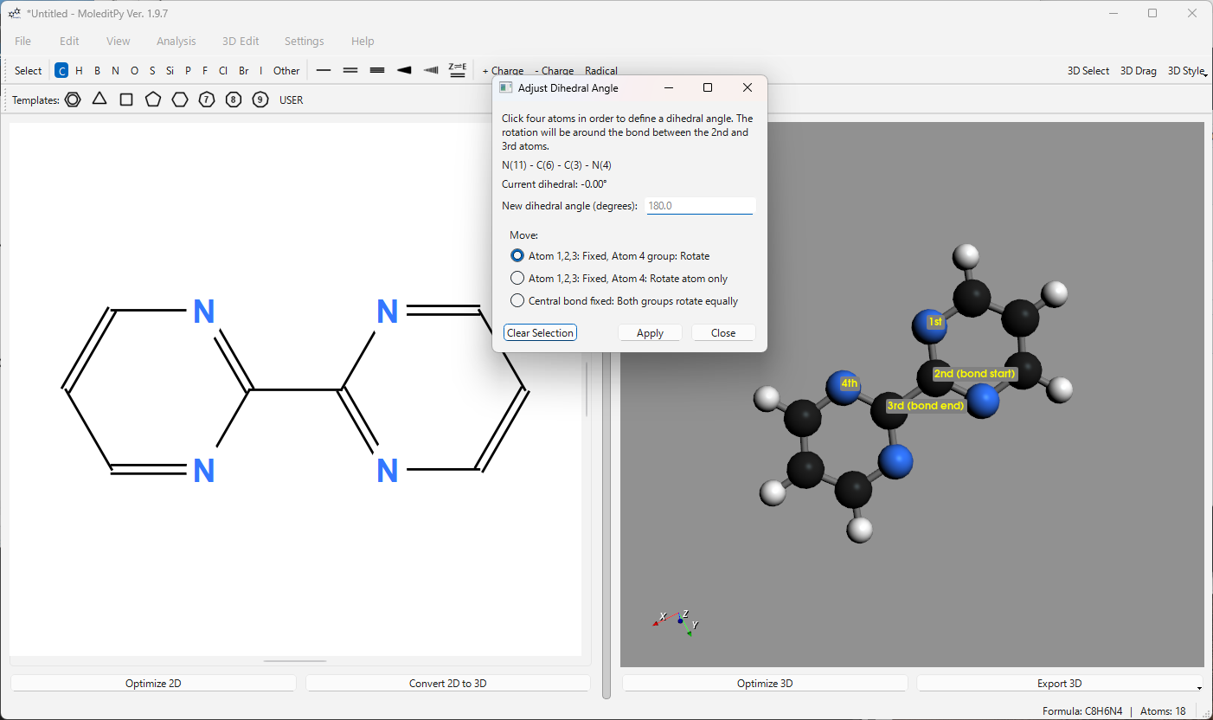
-
Adjust Dihedral Angle…: Changes the dihedral angle formed by four selected atoms (1-2-3-4) to a specified value. You can choose to rotate the atom 4 side (or its connected group) or rotate both groups equally. Includes an interactive slider for real-time adjustments.
-
Planarize…: Calculates the best-fit plane for three or more selected atoms and projects those atoms onto that plane.
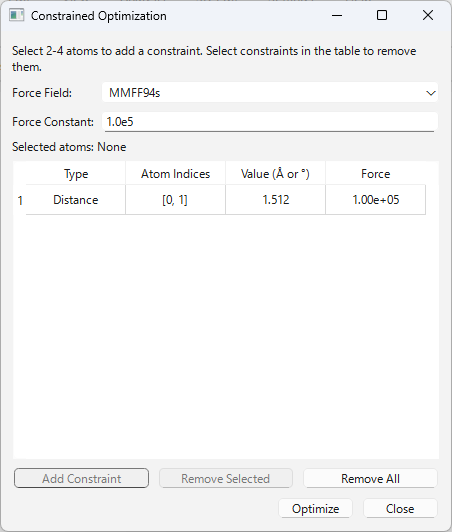
6.9. Constrained Optimization
This is an advanced feature that performs a molecular structure optimization (force field calculation) while keeping the values of specific atomic distances, angles, or dihedral angles fixed (constrained).
- Adding Constraints:
- Select
3D Edit>Constrained Optimization...to open the dialog. - In the 3D view, click 2 atoms (for distance), 3 atoms (for angle), or 4 atoms (for dihedral) to select them. The selected atoms are highlighted with yellow labels (A1, A2…).
- Press the “Add Constraint” button (e.g., “Add Distance Constraint”), and the current structural value will be added to the table.
- Select
- Editing and Deleting Constraints:
- Edit: Double-click (or select and press Enter) the “Value” column in the table to edit the constraint value directly.
- Delete: Select the constraint row(s) you wish to remove in the table and press the “Remove Selected” button or the
Delete/Backspacekey. - Verify: Selecting a row in the table highlights the corresponding atoms in the 3D view in cyan.
- Running the Optimization:
- Select the desired force field (MMFF94s, MMFF94, or UFF) from the “Force Field” dropdown. (The default value is loaded from the
Settingsmenu.) - Press the “Optimize” button (or the
Enterkey) to run the optimization while preserving all constraints listed in the table.
- Select the desired force field (MMFF94s, MMFF94, or UFF) from the “Force Field” dropdown. (The default value is loaded from the
6.10. Displaying Atom Information
From the menu View > 3D Atom Info Display, you can select the information to be displayed above each atom in the 3D view.
- Show Original ID / Index (or Show XYZ Unique ID): Displays the original ID if from the 2D editor, or the index within the XYZ file if from an XYZ file.
- Show RDKit Index: Displays the internal RDKit atom index.
- Show Coordinates (X,Y,Z): Displays the 3D coordinates of each atom.
- Show Element Symbol: Displays the element symbol for each atom.
Selecting the same menu item again will turn off the display.
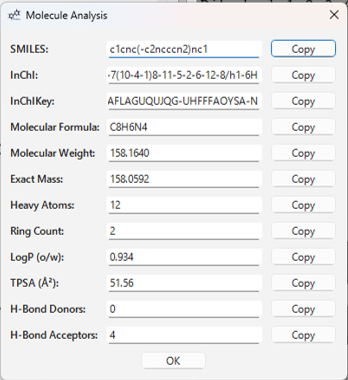
7. Molecular Analysis
Selecting Analysis > Show Analysis... from the menu will open a dialog that calculates and displays the basic properties of the molecule currently displayed in the 3D view (excluding those from XYZ files).
Example of displayed information:
- SMILES String
- InChI String / InChIKey
- Molecular Formula
- Molecular Weight
- Exact Mass
- Heavy Atom Count
- Number of Rings
- LogP (Octanol-water partition coefficient)
- TPSA (Topological Polar Surface Area)
- Number of Hydrogen Bond Donors/Acceptors
You can copy each value to the clipboard using the Copy button next to it.
8. Settings
You can configure various 2D and 3D display settings via Settings > Settings... in the menu.
Configurable items:
- 2D Settings Tab:
- View Appearance: 2D canvas background color
- Bond Settings:
- Bond Color
- Bond Width
- Double/Triple Bond Spacing
- Bond Cap Style (Round/Flat/Square)
- Wedge Bond Width
- Dash Count
- Atom Settings:
- Atom label font size
- Use Bond Color for Atoms (unified color)
- Scene (3D) Tab:
- Background color
- Show/Hide 3D axes
- Enable/Disable lighting
- Light intensity
- Surface shininess (Specular) and its intensity (Specular Power)
- Camera projection mode (Perspective / Orthographic)
- Display Style Tabs (Ball & Stick, CPK, Wireframe, Stick):
- Atom size/radius scale
- Bond radius
- Drawing quality (Resolution)
- Multi-bond options (Offset, Thickness) per model
- Other Tab:
- Whether to skip chemical validity checks when importing XYZ files
- Whether to use Kekulé structures (alternating double bonds) for aromatic systems (e.g. benzene)
- Whether to display aromatic rings as circles (torus) in 3D
- Aromatic torus thickness
Click the Apply button to reflect changes immediately, or the OK button to apply changes and close the dialog. You can also revert settings to defaults using Reset Current Tab / Reset All. Settings are retained for the next launch.
You can also reset all settings to defaults via Settings > Reset All Settings in the menu.
-
You can change CPK colors via
CPK Colors...in theSettingsmenu.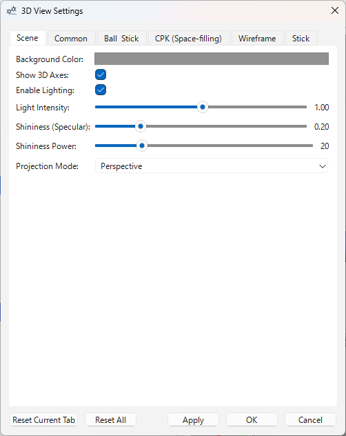
9. Keyboard Shortcuts
| Key | Function (Select Mode) | Function (Draw/Edit Mode) |
|---|---|---|
Space |
Switch to Select mode / Select All (if nothing selected) | Switch to Select mode |
C, H, N, O, S, P, F, I, B |
Switch to corresponding atom draw mode / Change atom under cursor to that element | Switch to corresponding atom draw mode |
Shift+C |
Cl draw mode / Change atom under cursor to Cl | Cl draw mode |
Shift+S |
Si draw mode / Change atom under cursor to Si | Si draw mode |
Shift+B |
Br draw mode / Change atom under cursor to Br | Br draw mode |
1 |
Single bond draw mode / Change selected or hovered bond to single bond / Add atom to atom | Single bond draw mode |
2 |
Double bond draw mode / Change selected or hovered bond to double bond | Double bond draw mode |
3 |
Triple bond draw mode / Change selected or hovered bond to triple bond | Triple bond draw mode |
4 |
(In empty space) Switch to Benzene mode / (On atom/bond) Place Benzene | Benzene mode |
W |
Wedge bond draw mode / Change selected or hovered bond to Wedge (click to reverse) | Wedge bond draw mode |
D |
Dash bond draw mode / Change selected or hovered bond to Dash (click to reverse) | Dash bond draw mode |
Z / E |
(On hovered double bond) Set Z / E configuration | (On hovered double bond) Set Z / E configuration |
. (Period) |
Toggle radical on selected or hovered atom (0->1->2->0) | Toggle radical on selected or hovered atom (0->1->2->0) |
+ / - |
Increase/Decrease charge on selected or hovered atom | Increase/Decrease charge on selected or hovered atom |
Delete / Backspace |
Delete selected or hovered item | Cancel operation (during drawing) / Delete selected or hovered item |
| Key | Function |
|---|---|
Ctrl+Z |
Undo |
Ctrl+Y / Ctrl+Shift+Z |
Redo |
Ctrl+C |
Copy Selection |
Ctrl+X |
Cut Selection |
Ctrl+V |
Paste |
Ctrl+A |
Select All |
Ctrl+R |
Rotate 2D Molecule |
Ctrl+N |
New |
Ctrl+O |
Open Project… |
Ctrl+S |
Save Project |
Ctrl+Shift+S |
Save Project As… |
Ctrl+J |
Clean Up 2D |
Ctrl+K |
Convert 2D to 3D |
Ctrl+L |
Optimize 3D |
Ctrl++ |
Zoom In (2D View) |
Ctrl+- |
Zoom Out (2D View) |
Ctrl+0 |
Reset Zoom (2D View) |
Ctrl+9 |
Fit to View (2D View) |
Ctrl+Shift+R |
Reset 3D View |
Ctrl+1 |
Panel Layout 50:50 |
Ctrl+2 |
Panel Layout 70:30 (2D Focus) |
Ctrl+3 |
Panel Layout 30:70 (3D Focus) |
Ctrl+H |
Toggle 2D Panel Visibility |
Ctrl+Q |
Quit |
10. Version / License
- Version: 3.0
- Author: Hiromichi Yokoyama
- License: GPL-3.0 license
- Repository: https://github.com/HiroYokoyama/python_molecular_editor
- DOI: 10.5281/zenodo.17268532
You can check the version information from the Help > About menu.